
As promised, I've put together a short picture heavy tutorial on how to create a set of six patchwork coasters :)
Step 1: Gathering Your Materials

This project doesn't use anything out of the ordinary...
-seamstress's chalk or some type of erasable fabric pen
-a rotary cutter or fabric scissors
-a ruler (I use my quilting square because I'm horrible at gauging a straight line!)
-a cutting board (if you're using a rotary cutter) or a flat surface to measure your fabric on
-a chopstick (which I forgot to include in the picture, hence the bright red, Photoshopped chopstick that is pictured :) )
-5 coordinating fat quarters of fabric
-felt
Step 2: Choosing Your Fabrics

You'll need five coordinating pieces of fabric, although you can use up to 10 coordinating pieces, depending on how different you want your coasters to be. I usually try to find fat quarter sets, for two reasons. First of all, they already coordinate and are often from the same designer or line of fabric. Secondly, because we'll be cutting 4.5" squares, an 18"x22" piece of fabric works perfectly and isn't too unwieldy if you have a small cutting surface like I do.
Step 3: Cutting Your Fabrics

Iron your fabrics (and please ignore the wrinkles in mine that give away the fact that I didn't iron mine ;) ) and then place them on your cutting mat or flat surface. You'll be cutting 6 4.5" squares from each of your five pieces of fabric. If you have a 12"x18" cutting mat like I do, arrange the fat quarter so it lines up with the 18" side on your left. Trim any extra edges to square up the fabric according to the measurements on your cutting mat. Take your ruler (or look on your cutting mat) and measure 4.5" from the left side, and draw a straight line from top to bottom. Measure another 4.5" from the left, and draw a straight line 9" up from the bottom, then across the top of your rectangle to meet the adjoining chalk lines.
Cut along these lines, then lay your two pieces flat on your cutting surface again. Measure 4.5" in, and cut, then do the same measuring & cutting three more times until each of your squares measures 4.5".
Do the same with your felt -- cutting 6 4.5" squares total.
Step 4: Coordinating Colors

Your finished coasters will include five different pieces of fabric -- four on the top and one on the bottom. Lay your squares out in such a way that the tops coordinate. I've played around with the different combinations a lot and I lean toward using two of the same fabrics on top and a third on bottom, but as you can see, you can use four different pieces on top as well. I've also used three of the same fabric and one different color that stands out. It all depends on what look you're going for and how your fabrics fit together. When you're done arranging your six coaster tops, you'll have six pieces of fabric left over for the bottoms. Set these aside until after you've ironed the top pieces.
Step 5: Ironing and Arranging

Decide whether you want your coasters tops to be squares or triangles and then start pressing the top pieces of fabric, keeping them in sets according to coaster as you go. If you decide to go the triangular route, be sure to line up the sides of your square as you fold it in half, trimming off any excess fabric as you go.
Once you've pressed all of your top pieces, choose a coordinating fabric from your un-pressed stack to finish off the bottom of the coaster.
Steps 6-9: Layering the Fabrics

You're halfway there :) There aren't any truly "difficult" steps in this project, but this one might be the most confusing, so take a deep breath! Here we go...
Step 6: Place your felt square on a flat surface, and place the coasting backing right-side up on top of the felt. Easy enough, right? :)
Step 7: Place your first triangle (or rectangle) on top of the backing and square it up with the corner(s). Place your second triangle on top of the first, moving counter-clockwise (you'll thank me for this later :) ). Again, square this one up with the corners and the first triangle that's already been placed.
Step 8: Place your third triangle on top of the pile, again moving counter-clockwise. Square this one up with the corners it touches as well as the fabric across from it and make sure they aren't overlapping very much, if at all. You also don't want to have a gap in the center, so if you need to nudge it towards the middle a little bit, go ahead and do this. If you've cut your squares correctly, however... everything should fit perfectly :)
Step 9: Take your last triangle and place it in the last corner. Then lift up the first triangle (or rectangle) you placed, and tuck the final triangle under it (similar to how you would secure a cardboard box without any tape). Square all four pieces of fabric and make sure they're not poking over the sides of the felt, etc.
Repeat steps 6-9 until all of your coasters are set up and ready to sew.
Step 10: Top Stitching

Now is when you'll start to thank me for making you place the triangles/rectangles in a counter-clockwise position. You'll start top-stitching, moving in a clockwise position, and the way you have placed the top pieces will allow you to sew in a smooth fashion, without causing the fabric to fold or catch.
I don't usually pin the layers of each coaster together, but if you're worried about fabrics slipping, feel free to pin as much as needed. Start top-stitching in the center of one side, with a quarter inch seam. When you reach the corner, lower your needle into the fabric, then raise your sewing machine foot and rotate your fabric 90 degrees to line up your fabric and stitch the second side. Continue sewing and turning until you're back to the spot where you started. Stitch about an inch over your initial starting point to secure the threads, then set the coaster aside.
Repeat until all six coasters are top-stitched and secure.
Step 11: Trimming Corners
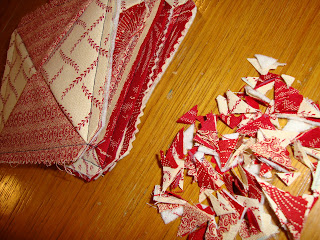
Trim the corners of your now top-stitched coasters, making sure to not cut the stitches, but to trim just outside of them. Then sit & admire the cute little pile of trimmed corners :)
Step 12: Turning the Coasters

Place the center of your middle finger on the corner you've just trimmed, and your forefinger and ringfinger on either side. Stick your thumb inside the pile of fabric, in between the top and bottom fabrics, and find the inside corner of the fabric. Turn the coasters inside-out and push the corners as far out as possible with your fingers.
Step 13: Squaring it Up

Using your chopstick or another long, thin device like the eraser-end of a pencil, push the corners out to square up the coaster. Be careful to not poke through the stitches, but square it up as much as possible so that your fabric isn't bunched up inside the coaster.
Step 14: Pressing for the Last Time

Press your coasters one last time... pretty self-explanatory ;)
The Finished Product

If you're giving your coasters away, tie them up with a pretty ribbon and send them on their way! If you're keeping them for yourself, enjoy them just as they are. :)
*Note: because these are made with fabric and felt, they can be washed & dried just like any other fabric items! And that, in my mind, is the best thing about them :)
If you make any coasters using this tutorial, I'd love to see them! Happy crafting :)
1 comment:
Umm, Mary it looks hard! :)
Post a Comment